Installation
and Maintenance
News
style advices
and curiosity
from the world
of ceramic
Guide to Installing Large Format Porcelain Stoneware
The installation of porcelain stoneware is a crucial step in any project. To achieve excellent results, it is important to rely on experienced installers for wall, floor, indoor, and outdoor installation of this type of product, using the most appropriate and updated techniques.
As with any other type of flooring and cladding, the durability and functionality of the installation depend heavily on careful planning, substrate preparation, and correct installation, which must be carried out using adhesives, grouting mortars, and sealants chosen appropriately according to the type and its intended use.
Correct Procedure for Installing Large Format Porcelain Stoneware
Regardless of the chosen effect or finish, the installation requires a specific procedure to ensure permanent results. One of the most delicate steps is cutting the slab. For an elegant and uninterrupted finish, it is advisable to make cuts near the corners or edges of the room. For kitchen cladding, pay particular attention to countertops and integrated sinks. The same applies to living room cladding, often characterized by open book or continuous vein designs. In this case, precise cutting and installation are crucial to maintain design continuity. Collaborating with your designer from the beginning is highly recommended, as this ensures a conscious choice of the slab to meet your tastes and needs.
Key Steps for Impeccable Installation of Porcelain Stoneware
-
Substrate Preparation: The first step for laying the material is to ensure that the substrate is free of cracks, dry, properly cured, homogeneous, flat, and clean. Depending on the base surface (plastered wall, existing floor, screed, etc.), it is essential to prepare the substrate with a specific product, such as adhesive or a particular type of mortar, to make it flat and ready to accommodate the slab.
-
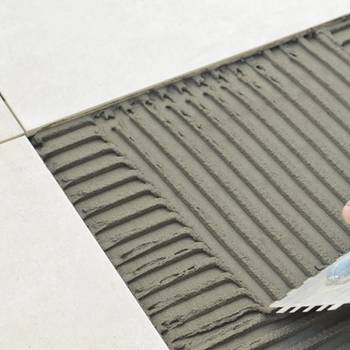
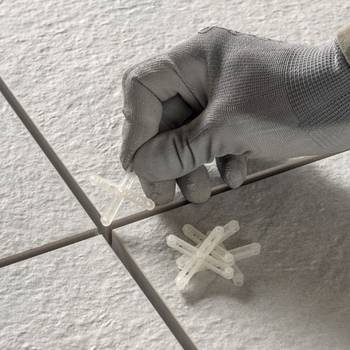
Preliminary Operations for Installation: The width of the joints must be determined and conveniently increased based on environmental conditions, intended use, slab dimensions, and substrate type. Always ensure to place expansion joints between the slabs to absorb any movements or contractions. The correct choice of adhesive is a fundamental factor to ensure a safe and reliable installation over time: to choose the most suitable adhesive, it is crucial to identify the type of slab to be installed from the outset. It should be noted that the almost zero absorption of porcelain stoneware combined with the presence of the reinforcement mesh (mat) requires the use of class C2 adhesives according to EN 12004. When using large format slabs, it is strongly recommended to use highly deformable class S2 products according to the same standard. In hot climates and adverse environmental conditions (wind, etc.), it is advisable to use adhesives classified as "E", i.e., with extended open time. In any case, the installation must be carried out on fresh adhesive, respecting the "open time", to ensure adequate transfer of the adhesive to the back of the tile. In case of installation during the winter period or in cold climates, prefer the use of fast-setting class "F" adhesives. These adhesives can complete the setting and achieve high adhesion values within a few hours of application, preventing the nighttime cold temperatures from turning the water used for mixing into ice. Fast-setting adhesives are also recommended when short installation times are required.
-
Cutting and Drilling Large Format Slabs: For successful cutting and drilling, always place the slab on a stable and flat work surface. Use products specifically designed and manufactured for porcelain stoneware. For linear cutting, place the cutting guide on the slab, then score the ends of the slab 1-2 cm from the inside outwards and then make the actual incision from one edge to the other, maintaining the same pressure throughout the length of the slab. Use special cutting pliers to break the slab starting from both ends following the incision line. Any mesh present on the back of the slab must be cut with a cutter. If directional changes are required, always make a hole in the corners before cutting. Circular holes can be made with wet or dry diamond drills. Once the slab is positioned on the work surface and the hole location is marked, the hole must be made with the drill entry position inclined about 75° to the slab surface to facilitate a precise entry. Once the drill starts to penetrate the slab, apply circular pressure while keeping the drilling area moist for wet drilling or vacuuming the resulting dust for dry drilling. For rectangular holes, first make a circular hole at each of the four right angles and then connect them with linear cuts using a grinder with a diamond disc specific for porcelain stoneware. This prevents excessive tension at the vertices, which could otherwise trigger a fracture.
-
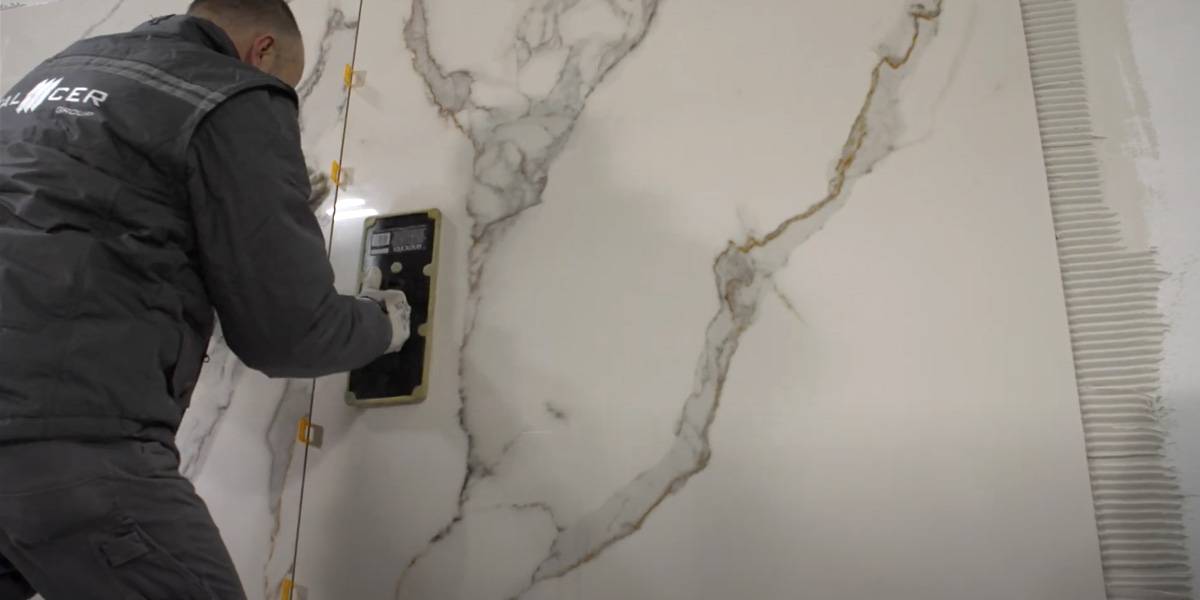
Slab Installation: In all applications, the double spreading technique must be used, i.e., the adhesive must be applied both to the substrate and the back of the slab. The installation must be done by overlapping the adhesive worms of the substrate and back-slab in parallel to facilitate air escape. It is suggested to perform the beating process starting from the center of the slab towards the sides, following the spreading direction and thus parallel to the short sides. The installation technique varies depending on the environment and chosen design. For marble-effect porcelain stoneware, it is recommended to position the veins towards the light to highlight the pattern. For wood-effect, arrange the veins vertically to increase the perception of height for cladding and length for flooring.
-
Grouting: After installation, fill the joints using cementitious or epoxy grouts that ensure durability and color stability over time. The width of the joints depends on the chosen slab type and desired effect. For elegant design environments, minimal joints are preferred, but never less than 2 mm; in this case, opt for rectified porcelain stoneware with straight edges.
-
Finishing and Cleaning: Once the slabs are installed, the installers perform the initial cleaning with a suitable diluted acid detergent to remove adhesive, mortar, or cementitious/epoxy grout residues, leaving the surface clean and ready for use. In particular, joint cleaning must be done with minimal water and using an abrasive sponge (like Scotch-Brite) and then with a hard cellulose sponge, taking care not to empty the joints. Epoxy grouts must be cleaned "fresh", using, if necessary, larger quantities of water to completely remove epoxy resin residues. This is also the time for any touch-ups to ensure an impeccable aesthetic result.
Tips for Ordinary and Extraordinary Maintenance
Porcelain stoneware is a compact, non-porous, highly resistant, and waterproof material, making it ideal for all applications. Daily cleaning is simple: use a damp cloth with a neutral detergent, while for extraordinary cleaning, to be carried out 3-4 times a year, we recommend using a suitably diluted degreasing acid detergent. By following these guidelines and collaborating with qualified professionals, you can achieve extraordinary results that enhance any space, and you will be ready to enjoy the beauty and longevity of your large format porcelain stoneware surfaces.